From Zero to Kickass Software Engineer: Using AI as Your Unfair Advantage

From Zero to Kickass Software Engineer: Using AI as Your Unfair Advantage
Five years ago, learning to code from scratch meant months of lonely tutorial hell before you could build anything real. Today, AI coding assistants — tools like ChatGPT, Claude, and Muse that generate and explain code from plain-English prompts — have flattened that curve. A motivated beginner can ship a working app in week one.
But here is the uncomfortable truth: AI will happily generate code you don't understand, and engineers who can't explain their own code don't stay employed. The people winning with AI aren't skipping the fundamentals — they're learning them faster by using AI as a tutor, pair programmer, and code reviewer.
This guide is a practical roadmap for going from zero software background to job-ready engineer, with AI as leverage at every step.
The Mindset Shift: AI Is Leverage, Not a Shortcut
Think of AI as a senior engineer sitting next to you 24/7 — infinitely patient, occasionally wrong. Your job is to become the engineer who directs it, questions it, and verifies its output. That means:
You write the spec, AI writes the first draft. Describe what you want in plain English, then read every line it produces.
You ask "why", relentlessly. Every AI-generated line you can't explain is a gap in your knowledge. Turn gaps into questions.
You own the result. If the code breaks in production, "the AI wrote it" is not an excuse. Understanding is non-negotiable.
Internalize this and you avoid the number-one failure mode: becoming a prompt operator who can demo but can't debug.
Phase 1: Foundations With an AI Tutor (Weeks 1–4)
Pick one language. For most beginners, Python (readable, huge job market) or JavaScript (runs in every browser, powers the web) is the right call. Don't agonize — concepts transfer.
Learn these in order, using AI as your personal tutor:
How software actually runs — files, the terminal (a text-based way to control your computer), and how code becomes a running program.
🖼️ See it in pictures: how desktop and web apps run
Words are forgettable — pictures stick. Trace each journey with your finger:
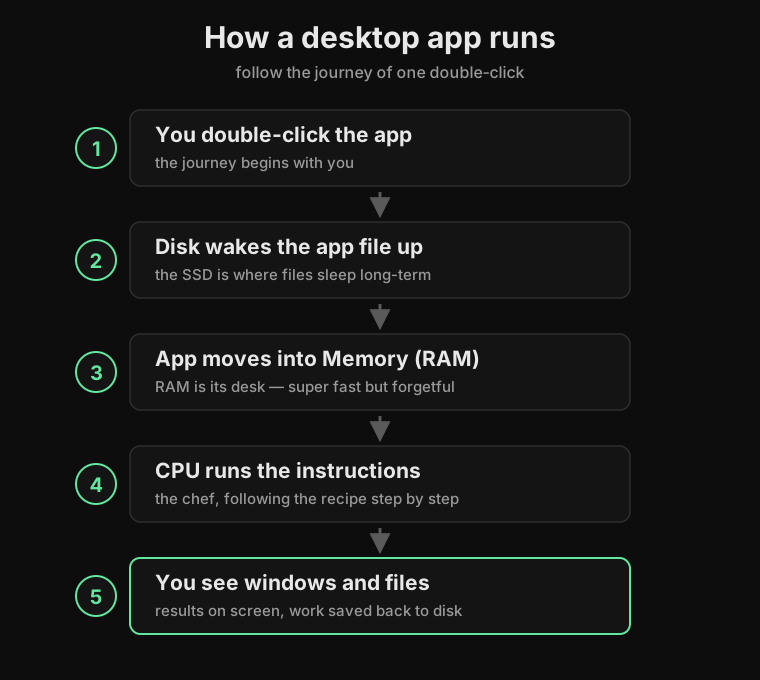
A desktop app is a one-computer story: everything happens on your own machine. The disk remembers, the memory thinks fast, and the CPU does the work.
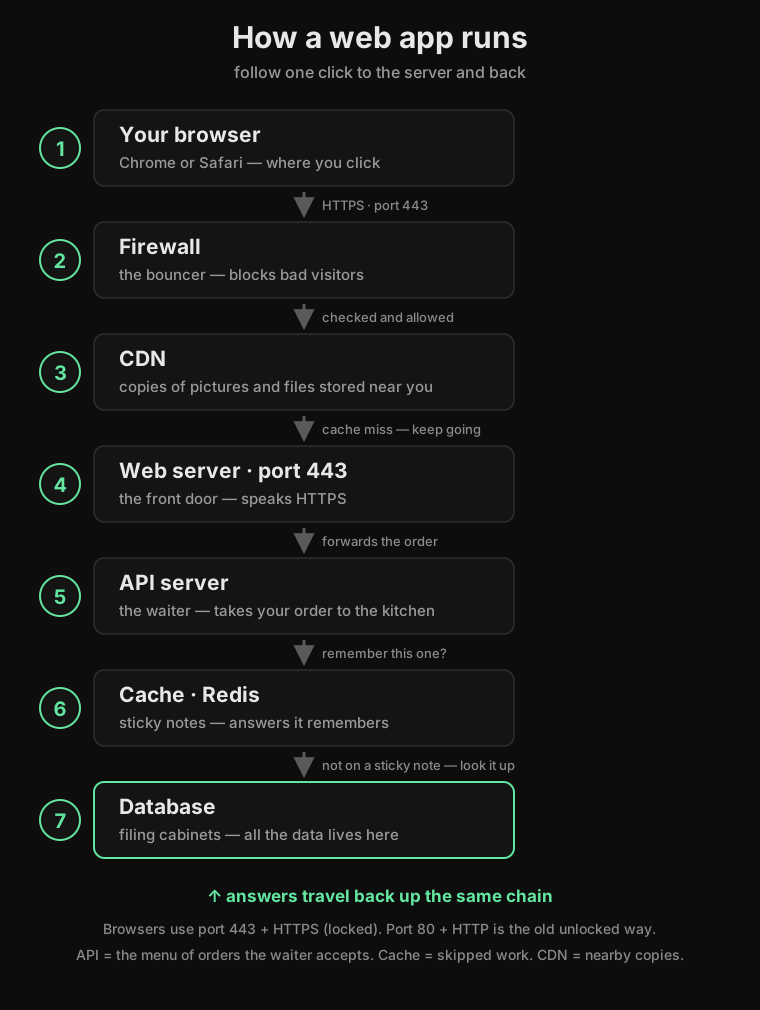
A web app is a team sport played across the internet. The new words, kid-style:
Port — the apartment number on a server building. Web traffic knocks on door 443.
Protocol — the language spoken at the door. HTTPS is HTTP with a secret handshake (locked 🔒).
Firewall — the bouncer who turns away troublemakers.
CDN — photocopies of pictures and files, stored in cities near you so they load fast.
Web server — the front door that greets every browser.
API — the menu of orders the kitchen accepts ("give me user number 5, please!").
Cache — sticky notes with remembered answers, so nobody repeats work.
Database — the filing cabinets where everything is really kept.
Follow-up exercise for your AI tutor: "I just learned what ports, protocols, and caches are. Quiz me with 5 questions, easy to hard."
Core programming concepts — variables, loops, conditionals, functions, and basic data structures like lists and dictionaries.
🍎 Brand new to code? Click here — variables, loops & friends, explained like you're 10
Think of the computer as a super-fast helper who takes everything very literally. It only understands a few simple ideas. Master these six and you can read almost any beginner program. Each example speaks 7 languages — flip the tabs! (Go and Rust fragments assume the usual
mainwrapper and imports.)📦 Variables = labeled boxes
A variable is a box with a name tag. You put something in, and later you ask for it by name.
favorite_snack = "cookies"
slices_eaten = 2
let favorite_snack = "cookies"; let slices_eaten = 2;let favorite_snack: string = "cookies"; let slices_eaten: number = 2;favorite_snack := "cookies" slices_eaten := 2let favorite_snack = "cookies"; let slices_eaten = 2;favorite_snack = "cookies" slices_eaten = 2$favorite_snack = "cookies"; $slices_eaten = 2;favorite_snackis the name tag,"cookies"is what's inside the box. The single=means "put this inside" (it is not the equals sign from math class!). Every language dresses boxes a little differently — PHP names start with$, Go uses:=to fill a box for the first time — but the idea is identical.🚦 Conditionals = choose-your-own-adventure
iflets the program make decisions, just like you do: if it's raining, then grab an umbrella, otherwise wear sunglasses.if slices_eaten >= 3: print("Slow down, champ!") else: print("Enjoy your snack!")if (slices_eaten >= 3) { console.log("Slow down, champ!"); } else { console.log("Enjoy your snack!"); }if (slices_eaten >= 3) { console.log("Slow down, champ!"); } else { console.log("Enjoy your snack!"); }if slices_eaten >= 3 { fmt.Println("Slow down, champ!") } else { fmt.Println("Enjoy your snack!") }if slices_eaten >= 3 { println!("Slow down, champ!"); } else { println!("Enjoy your snack!"); }if slices_eaten >= 3 puts "Slow down, champ!" else puts "Enjoy your snack!" endif ($slices_eaten >= 3) { echo "Slow down, champ!"; } else { echo "Enjoy your snack!"; }The program checks the question after
if. If the answer is yes, it runs the first block; if no, it runs theelseblock. (Notice>=means "greater than or equal to" — two characters working as one question.)🎠 Loops = the merry-go-round
A loop repeats something without you having to write it over and over. A
forloop says: "do this once for every item."for friend in ["Ana", "Ben", "Cory"]: print("High five, " + friend + "!")for (const friend of ["Ana", "Ben", "Cory"]) { console.log("High five, " + friend + "!"); }for (const friend of ["Ana", "Ben", "Cory"]) { console.log("High five, " + friend + "!"); }for _, friend := range []string{"Ana", "Ben", "Cory"} { fmt.Println("High five, " + friend + "!") }for friend in ["Ana", "Ben", "Cory"] { println!("High five, {friend}!"); }for friend in ["Ana", "Ben", "Cory"] puts "High five, #{friend}!" endforeach (["Ana", "Ben", "Cory"] as $friend) { echo "High five, $friend!"; }This prints three high-fives — one per friend. The loop grabs each name, puts it in the variable
friend, and runs the print. Round and round until the list is empty!📖 Functions = recipes
A function is a named set of steps you can reuse anytime, like a recipe. You define it once with
def, then "call" it by name whenever you're hungry for results.def greet(name): return "Hello, " + name + "!" print(greet("Ana")) print(greet("Ben"))function greet(name) { return "Hello, " + name + "!"; } console.log(greet("Ana")); console.log(greet("Ben"));function greet(name: string): string { return "Hello, " + name + "!"; } console.log(greet("Ana")); console.log(greet("Ben"));func greet(name string) string { return "Hello, " + name + "!" } fmt.Println(greet("Ana")) fmt.Println(greet("Ben"))fn greet(name: &str) -> String { format!("Hello, {name}!") } println!("{}", greet("Ana")); println!("{}", greet("Ben"));def greet(name) "Hello, " + name + "!" end puts greet("Ana") puts greet("Ben")function greet($name) { return "Hello, " . $name . "!"; } echo greet("Ana"); echo greet("Ben");greetis the recipe's name,nameis the ingredient you hand it, andreturnis the finished dish it hands back. Write once, eat twice!🧺 Lists = a row of cubbies
A list holds many things in order, like cubbies in a classroom — except computers start counting at 0 (silly, but true: the first cubby is number 0).
snacks = ["cookies", "apples", "cheese"]
print(snacks[0])  # cookies — the FIRST cubby
print(snacks[2])  # cheese — the THIRD cubby
const snacks = ["cookies", "apples", "cheese"]; console.log(snacks[0]); // cookies — the FIRST cubby console.log(snacks[2]); // cheese — the THIRD cubbyconst snacks: string[] = ["cookies", "apples", "cheese"]; console.log(snacks[0]); // cookies — the FIRST cubby console.log(snacks[2]); // cheese — the THIRD cubbysnacks := []string{"cookies", "apples", "cheese"} fmt.Println(snacks[0]) // cookies — the FIRST cubby fmt.Println(snacks[2]) // cheese — the THIRD cubbylet snacks = ["cookies", "apples", "cheese"]; println!("{}", snacks[0]); // cookies — the FIRST cubby println!("{}", snacks[2]); // cheese — the THIRD cubbysnacks = ["cookies", "apples", "cheese"] puts snacks[0] # cookies — the FIRST cubby puts snacks[2] # cheese — the THIRD cubby$snacks = ["cookies", "apples", "cheese"]; echo $snacks[0]; // cookies — the FIRST cubby echo $snacks[2]; // cheese — the THIRD cubbySquare brackets pick a cubby by number. (
#starts a comment — a note for humans that the computer ignores.)🗝️ Dictionaries = lockers with name labels
A dictionary also stores many things, but instead of cubby numbers you use name labels (called "keys"). Just like a real dictionary: look up a word, get its meaning.
ages = {"Ana": 10, "Ben": 11}
print(ages["Ben"])  # 11
const ages = { Ana: 10, Ben: 11 }; console.log(ages["Ben"]); // 11const ages: Record<string, number> = { Ana: 10, Ben: 11 }; console.log(ages["Ben"]); // 11ages := map[string]int{"Ana": 10, "Ben": 11} fmt.Println(ages["Ben"]) // 11use std::collections::HashMap; let mut ages = HashMap::new(); ages.insert("Ana", 10); ages.insert("Ben", 11); println!("{}", ages["Ben"]); // 11ages = { "Ana" => 10, "Ben" => 11 } puts ages["Ben"] # 11$ages = ["Ana" => 10, "Ben" => 11]; echo $ages["Ben"]; // 11Curly braces
{}hold pairs oflabel: thing. Ask for"Ben"and you get11. No counting cubbies!That's the whole starter pack: boxes, decisions, merry-go-rounds, recipes, cubbies, and lockers. Everything else in programming is built from these. Now go ask your AI tutor for exercises — you've got this! 💪
Git and GitHub — Git tracks changes to your code; GitHub hosts it online. Every professional workflow depends on them.
⏰ Git and GitHub: your code time machine (every command, kid-style)
Think of Git as a time machine for your code. Every
commitis a save point in a video game — mess up, and you teleport back. GitHub is the clubhouse online where copies of your time machine live, so teammates (and future-you on another computer) can share.Look around first
git status— "what changed since my last save point?" Run this ten times a day; it never breaks anything.git log --oneline— "show me the list of save points," one per line. Each starts with a short ID likea1b2c3d.git show a1b2c3d— "open that one save point and show me exactly what changed."git diff— "spot the difference between right now and my last save."
Make save points
git init— build a brand-new time machine in this folder. Run once per project, at the start.git add— put toys in the gift box (this in-between step is called staging). Nothing is saved yet! Pick what goes in:git add .— "box up EVERYTHING in this folder and below" — new files, edits, the works. This is the everyday one.git add *— "box up everything I can SEE." The*is the shell's magnifying glass: it skips hidden dotfiles (like.env), so plain.is usually what you want.git add shopping.py— box up just one toy. Naming several works too:git add eggs.py bacon.py.
git commit -m "Add high-five loop"— wrap the box and write a label on it. Now it's a save point.git tag v1.0— stick a gold star on a special save point, like a finished version.
Undo and tidy up
git restore oops.py— "oops, put that file back how it was at my last save." Unsaved changes vanish — that's the point.git reset— unwrap the gift box (unstage) but keep your toys. Add--hardand the time machine smashes all the way back to the last save, deleting unsaved work — ask your AI tutor before ever using--hard.git rm old.py— throw a file away and tell Git about it in one move.git mv a.py b.py— rename a file and tell Git in one move.git stash— shove unfinished work into a drawer so your desk is clean.git stash popbrings it back out.
Parallel universes
git branch experiment— start a parallel universe to try something risky without touching your good code.git switch experiment— hop into that universe.git switch mainhops home.git merge experiment— fold the experiment back into your current universe. Mostly magic; sometimes Git asks you to resolve a conflict (two people edited the same lines) — pick the winner, save, commit.git rebase main— replay your universe's saves on top of the newestmain, like re-stacking blocks neatly. Powerful and slightly spicy — have AI walk you through your first one.
Teamwork through GitHub
git clone https://github.com/ana/pets.git— photocopy the clubhouse project onto your computer, history and all.git fetch— peek at what's new in the clubhouse without touching any of your stuff.git push— send your new save points up to the clubhouse.git pull— fetch + merge in one hug: grab the new stuff and fold it into yours.
Detective tools
git grep "TODO"— search every file in the whole project for a word, instantly.git bisect— find which save point broke the game using the number-guessing trick: Git picks a save in the middle, you answer "good or broken?", and it halves the suspects each round until one save is caught red-handed.
Wait — what about
backfill?Trick entry:
backfillis not a real Git command! It's a grown-up word for "fill in missing past stuff later" — like writing tests for old code, or importing history from somewhere else. If someone asks you to backfill, ask what and with which tool, then use the real commands above.GitHub walkthrough: your first upstream
Made a project on your computer with
git init? Give it a clubhouse. Create an empty repository on github.com (no README yet), then:git remote add origin https://github.com/YOU/pets.git git push -u origin mainoriginis just the nickname for your clubhouse's address ("upstream provider" in grown-up words). The-umeans "remember this, so plaingit pushworks from now on." Your daily loop becomes:pull→ work →add+commit→push.GitHub Actions: robot helpers
Actions are robots that wake up every time you push and check your work — usually by running your tests. Add this file and you have a robot:
# .github/workflows/ci.yml
on: [push]
jobs:
  test:
    runs-on: ubuntu-latest
    steps:
      - uses: actions/checkout@v4
      - run: python -m pytest
Translation: "on every push, grab a fresh computer, download my code, run my tests." Green check means all good; red X means click it, read what failed, and fix it. Your first Action doesn't need to be fancy — a robot that runs your tests already puts you ahead of most beginners.
Reading error messages — the single most underrated beginner skill.
🔍 Turn scary errors into lessons with AI
Every error message is secretly a tiny treasure map. It looks scary; it is mostly helpful. Here's the recipe:
Read the LAST line first. That's the complaint in plain words.
NameError: name 'greet' is not definedmeans "you used the namegreet, but I never met anyone called that."Read the file and line number above it. That's the X on the map —
app.py, line 7tells you exactly where to look.Copy the WHOLE error, not just the last line. The middle lines are the trail of footsteps showing how the program got there.
Then hand it to AI with this template:
I'm learning Python. I ran [what you ran] and expected [what you wanted].
I got this error:
[paste the FULL error here]
Here's my code:
[paste the smallest code that breaks]
Please: 1) explain what the error means like I'm 10,
2) tell me WHY it happened, 3) show the fix,
4) show me how to avoid it next time.
Two rules that make you look senior fast:
Never paste secrets. Passwords, API keys, and private company code stay OUT of the chat. Replace them with
FAKEKEY123before pasting.Ask for the lesson, not just the fix. End with: "What concept should I study so I truly understand this?" Then study that — this is how errors become promotions.
Try it now: break something tiny on purpose (delete a colon, misspell a name), read the error with the recipe above, and watch yourself debug like an engineer.
The trick is how you prompt. Don't ask for answers — ask for lessons:
I'm a beginner learning Python. Explain what a "for loop" is using a
real-world analogy, then give me 3 small exercises from easy to hard.
Don't show me the solutions until I ask.
Then attempt the exercises, paste your solution back, and ask:
Here's my solution. Review it like a senior engineer mentoring a junior:
point out bugs, style issues, and one thing I could do more idiomatically.
That feedback loop — attempt, review, revise — is worth more than any course.
Phase 2: Build Real Projects With an AI Pair Programmer (Weeks 5–10)
Tutorials teach syntax. Projects teach engineering. Start building embarrassingly small things and grow:
5 — Project: Command-line to-do app; What it teaches: Functions, file I/O, program structure
6–7 — Project: Personal website with HTML/CSS/JS; What it teaches: How the web works, debugging in the browser
8–10 — Project: Full mini-app (e.g. expense tracker with a database); What it teaches: APIs, databases, putting it all together
For each project, make AI do the scaffolding while you do the thinking. A strong workflow:
Describe the design first. "I want a to-do CLI app with add, list, and delete commands, storing data in a JSON file. Suggest a file structure and explain your choices."
Generate one piece at a time. Never ask for the whole app at once — you won't understand it.
Break it on purpose. Change things, run it, read the errors. Ask AI to explain why the error happened, not just to fix it.
Example — after AI generates your first function, interrogate it:
def add_task(tasks, title):
    tasks.append({"title": title, "done": False})
    return tasks
Explain this function line by line. What is `append` doing? What would
happen if `tasks` were a dictionary instead of a list? How would you
write a test for this function?
Congratulations — you just studied data structures, defensive thinking, and testing from six lines of code. That is leverage.
Phase 3: Learn to Think Like an Engineer (Weeks 11–16+)
This is what separates kickass engineers from people who can prompt. Drill these deliberately:
Decomposition. Given any feature ("user login"), practice breaking it into small steps before touching AI or code. AI executes plans; engineers make them.
Reading code. Ask AI to walk you through a small open-source file line by line. Reading is 80% of professional engineering.
Testing. A test is code that automatically checks your code works. Ask AI: "Write tests for this function and explain what each test proves." Then make a habit of it.
Debugging systematically. When something breaks: reproduce it, form a hypothesis, test the hypothesis. Ask AI to guide your debugging with questions instead of handing you the fix.
System design basics. How does a request travel from browser to server to database and back? Draw it, then have AI critique your diagram.
A milestone to aim for: build one project without AI writing any logic — use it only for explanations and reviews. If you can do that, you own the fundamentals.
Pitfalls That Kill AI-Accelerated Careers
Blind copy-paste. If you can't explain it, don't ship it. Interviewers and production incidents will find out.
Tutorial hell 2.0. Generating ten AI apps teaches less than deeply understanding one. Depth beats volume.
Leaking secrets. Never paste passwords, API keys, or private company code into public AI tools. Use placeholder values instead.
Skipping computer science basics. You don't need a degree, but you do need to understand how the internet, databases, and version control work. AI can't compensate for missing mental models forever.
No public proof. Hiring managers trust GitHub profiles and live demos, not claims. Push code early and often.
Your 90-Day Plan at a Glance
Days 1–30 — Focus: One language + Git + terminal, AI as tutor; Done looks like: You can solve beginner exercises and explain your solutions
Days 31–60 — Focus: Two small projects, AI as pair programmer; Done looks like: Two repos on GitHub with README files you wrote yourself
Days 61–90 — Focus: One bigger project + testing + reading others' code; Done looks like: A deployed app, tests in the repo, and one open-source contribution or detailed code review
Takeaways and Next Steps
AI compresses the time from zero to building, but understanding is still the job.
Use AI in three roles: tutor (explain), pair programmer (draft), reviewer (critique).
Build in public from day one — your GitHub is your résumé.
Depth beats breadth: one language, a few projects, deeply understood.
Next steps for this week:
Install Python or Node.js, create a GitHub account, and learn basic terminal commands.
Complete five AI-tutored exercises using the prompt pattern from Phase 1.
Start your to-do CLI project and push it to GitHub — messy is fine.
The engineers who thrive in the AI era won't be the ones who type the fastest or memorize the most syntax. They'll be the ones who think clearly, verify rigorously, and learn relentlessly — with AI multiplying every hour they put in. Start today, and let it multiply yours.
Related reading


Comments
Comments disabled — configure NEXT_PUBLIC_GISCUS_* env vars.